|
|||||||||||||||||||||
|
|
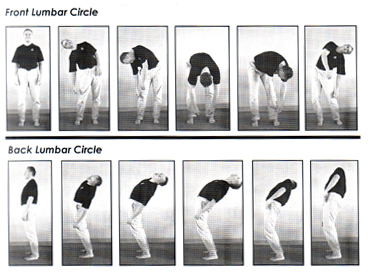
7 Ways To Injury Proof Your Back And Build A Bulletproof Mid-section By Kyle Battis, CSCS, NSCA-CPT, ATC www.homegymsecrets.com Of course the biggest secret to great abs is getting rid of the fat that covers them up. All the abdominal exercises in the world will not solve an excess body fat problem, as spot-reducing is more of a dream than it is a reality. A combination of the right mindset, supportive eating, full-body resistance training focusing on multi-joint complex exercises, and various types of cardiovascular exercise will bring you 90% of the way towards your goals of revealing your abdominals. I will leave the topic of dieting to strip the extra fat off your midsection in the capable hands of the fat-loss Guru Tom Venuto and focus-in on exercise in this article. Once you have your diet dialed-in and you are following a well-designed resistance training program, try implementing the following seven exercises into your routine to build a strong, coordinated mid-section and a healthy back. 1. Standing Lumbar Full Circles (Z-Health) When it comes to improving abdominal and low back health, you must understand that there is a big difference between abdominal strength and abdominal coordination. A lot of people injure their back during relatively-easy daily tasks such as picking a pencil up off the floor. Many times the result of this injury is not due to low levels of strength but instead due to a poor coordination of the muscles that are supposed to be supporting and protecting your spine (you abdominals and low back muscles). Think about it this way. Picture a very large, very powerful cannon from the 1800s. Despite its great power, it was not terribly accurate. If you compare that 1800s cannon to todays artillery, you will note that todays weapons are still very powerful, but are much more accurate. In warfare and in injury prevention, "accuracy" is the key to success. Many people spend a lot of time trying to improve abdominal and low-back strength in hopes that it will protect their back from injury when in reality higher levels of strength have not been shown to prevent injuries. Researchers like Stuart McGill and Dr. Eric Cobb have actually shown that low-back endurance and coordination are better goals than low-back strength for preventing back injuries.. Simply put, your body adapts to what you ask it to do so if you want to improve abdominal and low back health you must train standing up some of the time, you must train at different speeds, and you must train through different ranges of motion. Coordination patterns built laying on the floor with traditional abdominal exercises do not carry over very well to what we do in daily life (because most activities of daily life are done standing in the upright position). So without further adieu, here is an exercise that will help teach you how to develop abdominal coordination in a standing position. It will also teach you how to balance out tension and relaxation and improve the mobility of your low back. This exercise is taken from Dr. Eric Cobbs Z-Health system and I highly recommend learning more about Z-Health as it will help you do everything that you do better! Here is a picture sequence of Dr. Eric Cobb performing the Lumbar Full Circles: Lumbar Circles 1.) Assume a shoulder width stance with both feet facing straight ahead. Begin by running your hand down the outside of your leg and tilting your low back out to the side. Try to completely relax your upper back and your neck. Let your arms and your head completely hang with no tension at all. Try to keep your spine lengthened out as much as possible throughout the entire movement. 2.) As you reach down the side of your leg as far as you can without creating tension, create a semi-circle motion out around the front of your feet. Round out the front of the circle to the other side of your body. 3.) As your approach the side of your body, drop your head back while maintaining long spine. Lead the movement with your eyes and think about tracking around towards the wall behind you in an arching motion. As you arch back be sure to breathe out throughout the entire range of motion. Round out your circle to the side that you started on and return to a long spine, perfect posture. 4.) Repeat the movement twice each direction (completing two complete circles each direction). Options and Tips for the Full Lumbar Circles
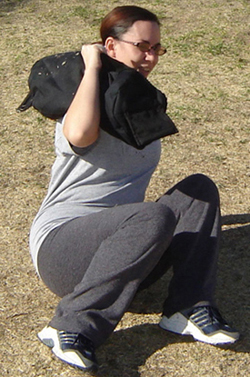
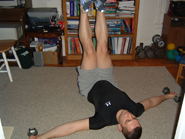
2. Turkish Get-Ups with a Sandbag The Turkish get-up was a favorite of old school strongmen. This fun and different movement trains your abdominals in ways you never imagined, trains you stabilizers, hits your all-important core muscles, and improves balance as well as functional strength. It is also building effective coordination patterns for your abdominal and low-back muscles that will actually carry-over to what you do in the real world. Compare how the abdominals are working in this movement compared how they work in typical abdominal training machines. The strength developed on machines is misdirected and not useable in certain ranges of motion where as the strength and coordination developed by an exercise like this has great carryover to your daily activities (and your training should help enhance your life right?). Here's how to perform this movement
1.) Lie on your back on the floor. Hold a dumbbell, kettlebell, barbell, or even a sandbag (as shown above) in one hand extended in the air above you. You can see that by using a sandbag you may have to use two hands to perform the movement properly which increases the difficulty of this exercise even further. Your elbow should be locked and you should keep your arm perpendicular to the floor throughout the entire movement. 2.) Your goal is to stand up with the weight, without unlocking your elbow and keeping the sandbag in the air above you. The first step is usually to turn to your side and prop yourself up on one hand (you can do this if you are using a dumbbell, kettlebell, or a barbell but if you are using a heavier sandbag as shown above you will have to use both hands to stabilize the weight). Another option is to use a lighter and smaller sandbag and using only one arm to perform the movement. 3.) Try to get up on one knee. The arm with the weight should still be completely vertical and locked tight. 4.) Now stand up completely. 5.) Reverse the movement until youre back at step one lying on the floor with the weight still extended above you. Options and Tips for the Turkish Get-Up
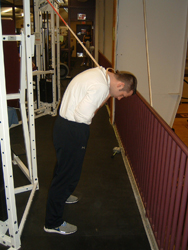
3. Standing Ab Crunches with "Iron Woody" Bands Who ever said abdominal exercises needed to be done lying on your back squirming around like a fish out of water? This will help develop some abdominal strength levels in a standing position.
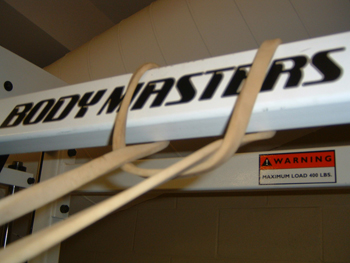
1.) Start by looping or choking an Iron Woody Mini-Band around the top of a squat rack. Grab both sides of the Mini-Band and hold them tight against the top of your collar bones. Mini-Band choked around the top of a squat rack:
2.) Walk away from the rack so that there is some tension at the top of the range of motion. Assume a shoulder width stance and start the movement with a long spine position. Flex forward at the waist trying to bring the bottom of your rib cage towards the top of your pelvis. 3.) Continue flexing forward at the waist until your abdominal muscles are fully-contracted. Hold this position tightly for a second and then slowly uncurl back to the start position. 4.) Repeat for a set of 8-12 repetitions. Options and Tips for the Standing Ab Crunches
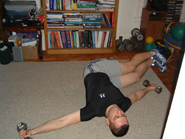
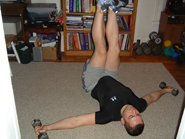
4. Lying Trunk Twists This is a great rotational exercise that can be performed with minimal equipment that really recruits your abdominal and low back muscles very strongly.
1.) Lie on floor or a workout mat. Place a Dumbbell on each side of you (to hold onto and keep your upper torso stable!). 2.) Raise your legs so they are perpendicular to the floor (note: bending knees will make this exercise easier if the movement with straight legs is too difficult) 3.) Brace your abdominals, lower body muscles, and upper body muscles. 4.) Slowly lower feet in an arcing motion to your right side (feet should stay in same plane of movement). Keep muscles tight and stop movement when feet are right above the floor (or as far as your range of motion will comfortably allow). 5.) Reverse the motion by pulling your lower body back to the start position with your oblique and rotational muscles. Repeat on both sides for the desired number of repetitions. Options and Tips for the Lying Trunk Twists
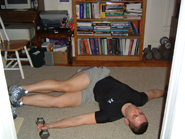
5. Plank As I stated earlier, researchers have found that developing a good mix of the proper coordination patterns and abdominal/low back endurance are key traits in preventing low back injuries. This exercise is one of Dr. Stuart McGills top exercise choices for improving abdominal and low-back endurance and coordination. I tend to work this exercise into the end of my clients training sessions but it certainly can be used in the beginning of your training sessions as well.
1.) Lie on the floor in the Plank position shown above. 2.) Maintain a long spine position and keep your body straight as a board. Assuming this long spine position will engage the stabilizing abdominal and low back muscles. 3.) Do not hold your breath, be sure to breathe as naturally as you can while holding the Plank position isometrically (meaning no movement!). 4.) Keep your abdominals, low back muscles, shoulder, arm and lower body muscles tight throughout the duration of the exercise. 5.) The exercise should be stopped before technique breaks down. Focus on quality over quantity! Options and Tips for the Lying Trunk Twists
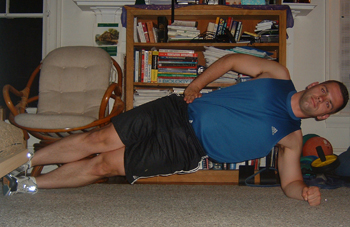
6. Side Plank This exercise is also a great choice for improving low back and abdominal endurance. It looks really easy but this exercise is surprisingly challenging. I like to work this exercise into the end of my clients training sessions but as I stated above with the planks this exercise can be performed at the beginning of the workout as well.
1.) Lie on the floor in the Side Plank position shown above. 2.) Maintain a long spine position and keep your body straight as a board. Assuming this long spine position will engage the abdominal and low back muscles. 3.) Do not hold your breath, breathe as naturally as you can while holding the Side Plank position isometrically (meaning no movement!). 4.) Keep your abdominals, low back muscles, shoulder, arm and lower body muscles tight throughout the duration of the exercise. 5.) The exercise should be stopped before technique breaks down. Focus on quality over quantity! Options and Tips for the side plank
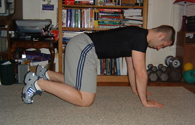
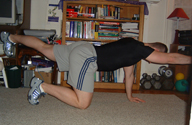
7. Horse Stance Exercise This exercise is a one of the top exercises for low-back health and improving levels of low-back endurance. Back-health expert, Dr. Stuart McGill uses this exercise in many of his low-back rehabilitation and injury prevention programs. This exercise will help balance out some of the abdominal work that you have been doing and improve the health of your back. It also improves the coordination of the small back muscles that help protect your spine during daily activities.
1.) Kneel on floor with knees under hips and hands under shoulders. Keep a slight bend in elbows (i.e. do not lock elbows out). 2.) Lengthen out your spine as much as possible (think Long Spine). Assuming this long spine position will engage the abdominal and low back muscles. 3.) Slightly lift your left hand off of the floor first and then lift your right leg off of the floor while being sure to keep the mid-section stable and your spine long. 4.) Extend the hand as far forward as you can while simultaneously extending the foot back as far as you can (really try to stretch yourself in both directions!). Be sure not to hold your breath. 5.) At full extension pause and squeeze your back and abdominal muscles for a second and then slowly lower your arm and leg while keeping core stable. 6.) Repeat on opposite side and continue alternating repetitions until you have completed the set. Options and Tips for the Horse Stance Exercise
So there you have it. 7 exercises to help injury-proof your back and build a bullet-proof mid-section. Some of the concepts conveyed in this article may go against conventional abdominal training ideas but I challenge you to think outside the box a little and give them a try. I think that you will find that these exercises will deliver tremendous improvements after only a couple weeks of working these exercises into your training routine. Train with purpose,
Kyle Battis CSCS, ATC, NSCA-CPT
|
|
|||||||||||||||||||